CBSE Class 10 Answered
Dear student,
The most common type of electric motor is the brushed dc electric motor. This is the kind that you'll find inside essentially everything that moves (or shakes) and runs on batteries. This type of motor attracts an electromagnet towards a permanent magnet. When the two are close enough,the polarity of the current through the electromagnet is reversed, so that it now repels the permanent magnet, and thus keeps turning.
Step ! Make the magnetic coil. Take a thin, coated magnet wire or copper wire, and wrap it 10 times around the edge of the paper tube. Leave a few inches of loose wire at the start and end of the coil.
Step 2:Carefully take the coil off the tube and wrap the ends of the wire around the coil at opposite points of the circle. Add some tape to help keep the coil together if needed. Once you have the coil secure and balanced, you can cut off excess wire leaving only an inch on either side.
Step 3:Start making the base. Poke four holes in the plastic cup using the thumbtack. Place one hole 1/2 inch from the top, and another 1/2 inch from the bottom, then do the same on the opposite side. If you don't have a plastic cup, a styrofoam or paper cup will work too.
Step 4:Cut two pieces of stiff wire at a three times the height of the cup and thread them through the holes in the cup.
Step 5:Position the cup so that the open end is facing down. Place one magnet on the outside of the closed end of the cup. On the inside, place another magnet, or more if necessary, to hold the first magnet in place.
Step 6:Sand the ends of the wires at the base of the cup and set them up to connect them to your battery.
Step 7:Start adjusting the wires that will hold the coil. Stand the coil up on the magnet and match the height of the coil to the support wires. Bend one of the wires connected to the base forward, and the other backwards at the height of the coil.
Step 8:Keep bending the wires to create a perch for the coil, so that the coil is held up to have as little space as possible between the coil and the magnet.
Step 9:ake the coil and sand all the coating off one of the support wires. On the other wire, only sand off half of the coating so that the coating will start to touch the support when the coil is closest to the magnet. If you want to adjust the sanding, you can just apply a new coating with a permanant marker.
Step 10:Connect the battery and test your motor. Secure the wire to the battery using tape, making sure that either end of the wire is touching the positive and negative ends of the battery. Some minor adjustments may be needed.
Team
Topperlearning.com
Application Videos
-
Power rating
 This video shows the calculation of electricity consumed, electric current ...
 -
Some other formulae for calculating power ...
 This video shows explains the application of formula for calculating the po...
 -
Cost of electricity
 This video describes the calculation of cost of electricity for electrical ...
 -
Combination of resistors -parallel
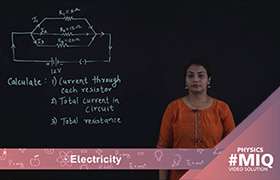 This video describes the calculation of effective resistance, total current...
 -
Combination of resistors -series
 This video describes the calculation of electric current flowing through th...
Concept Videos
-
Electricity
 Define resistance and resistivity, factors on which they depends. Explain ...
 -
Electricity
 Explain Joule's law of heating, heating effect of electric current, electr...
 -
Electricity
 Explain a series and a parallel combination of resistors in a circuit. Det...
 -
Electricity
 Define electric current, direction of current, ampere, potential differenc...
 -
Electricity
 Define resistance and resistivity, factors on which they depends. Explain ...