Class 9 FRANK Solutions Physics Chapter 1: Measurement
Revise Frank Solutions for ICSE Class 9 Physics Chapter 1 Measurement at TopperLearning. Go through the three systems of unit. Learn the unit of SI system with textbook solutions by our experts. Also, learn the uses of Vernier calipers in this chapter.
You can achieve top marks in ICSE Class 9 Physics by using our Frank textbook solutions, Selina solutions, etc. for chapter revision. Understand how to measure objects using various measuring instruments while practising the model answers for Chapter 1. Once you understand the chapter concepts, attempting chapter-related questions will become easy for you.
15
16
28
29
30
38
44
46
47
48
49
50
Measurement Exercise 15
Solution 1
Measurement is an act or the result of comparison of a quantity whose magnitude is unknown with a predefined standard.
Solution 2
The physical quantities like mass, length and time which do not depend on each other are known as fundamental quantities.
Solution 3
Length, mass, time are the three fundamental quantities.
Solution 4
Unit is a standard quantity of the same kind with which a physical quantity is compared for measuring it.
Solution 5
A standard metreis equal to 1650763.73 wavelengths in vacuum, of the radiation from krypton isotope of mass 86.
Solution 6
Three systems of unit are
(a) C.G.S system - fundamental unit of length is centimetre(cm), of mass is gram(gm), of time is second(s).
(b) F.P.S system- fundamental unit of length is foot(ft), of mass is pound(lb), of time is second(s).
(c) M.K.S system- fundamental unit of length is metre(m), of mass is kilogram(kg), of time is second(s).
Solution 7
The SI unit of mass is Kilogram. One standard kilogram is equal to the mass of a cylinder of nearly same height and diameter and made up of platinum and iridium alloy.
Solution 8
Three units of length greater than a metre are
(a). Decameter = 10 metre
(b). Hectometer = 100 metre
(c). Kilometer = 1000 metre
(a). Decameter = 10 metre
(b). Hectometer = 100 metre
(c). Kilometer = 1000 metre
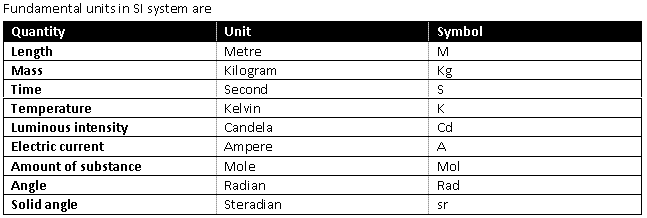
Solution 9
Solution 10
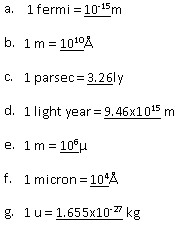
Light year is defined as the distance travelled by light in vacuum in one year.
Solution 11
Two units of length smaller than a metre are
(a). Decimeter = 0.1 metre
(b). Centimeter = 0.01 metre
(a). Decimeter = 0.1 metre
(b). Centimeter = 0.01 metre
Solution 12
Leap year because it is a unit of time.
Solution 13
Order of magnitude of a physical quantity is defined as its magnitude in powers of ten when that physical quantity is expressed in powers of ten with one digit towards the left decimal.
For example, volume= 52.37 m3 then the order of magnitude is 102m3.
For example, volume= 52.37 m3 then the order of magnitude is 102m3.
Solution 14
No, micron is not same as millimeter because micron is equal to 10-6metre while a millimeter is equal to 10-3metre.
Solution 15
Solution 16

Solution 17
A leap year refers to a year in which February has 29 days and the total days in the year are 366 days.
Measurement Exercise 16
Solution 18
Solution 19
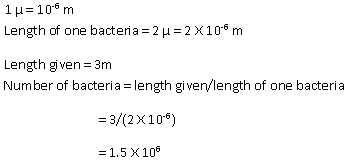
Solution 20
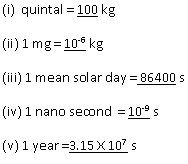
Measurement Exercise 28
Solution 1
When one complete rotation is given to the screw hand, it moves forward or backward by a distance is called pitch of the screw. It is distance between two consecutive threads of the screw.
Pitch of the screw = distance travelled by screw in n rotations/n rotations
Pitch of the screw = distance travelled by screw in n rotations/n rotations
Solution 2
No, least count is not same as pitch because least count is found by dividing pitch by number of divisions on the circular scale.
Solution 3
Two uses of vernier caliper are
(a). Measuring the internal diameter of a tube or a cylinder.
(b). Measuring the length of an object.
(a). Measuring the internal diameter of a tube or a cylinder.
(b). Measuring the length of an object.
Solution 4
Two limitations of metre rule
(a). There comes an error of parallax due to thickness of the metre rule.
(b). We cannot use metre rule for measuring small thickness.
(a). There comes an error of parallax due to thickness of the metre rule.
(b). We cannot use metre rule for measuring small thickness.
Solution 5
When one complete rotation is given to the screw hand, it moves forward or backward by a distance called pitch of the screw. It is distance between two consecutive threads of the screw.
Pitch of the screw = distance travelled by screw in n rotations/n rotations
Least count refers to the smallest reading that can be accurately measured while using an instrument. The least count is the value of one division on its scale.
Pitch of the screw = distance travelled by screw in n rotations/n rotations
Least count refers to the smallest reading that can be accurately measured while using an instrument. The least count is the value of one division on its scale.
Solution 6
Initial level of water in cylinder = 30 ml
Level of water in cylinder after immersing piece of copper = 50 ml
Volume of copper piece = 50-30 = 20 ml
Level of water in cylinder after immersing piece of copper = 50 ml
Volume of copper piece = 50-30 = 20 ml
Measurement Exercise 29
Solution 7
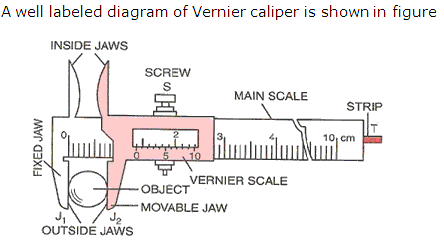
Solution 8
The ratchet is used in a screw gauge to hold the object under measurement gently between the studs.
Solution 9
If the zero of the circular scale does not coincide with the zero of the main scale (pitch scale), this is known as zero error. There are two types of zero error -
(a). If the zero of the circular scale remains below the line of graduation then it is called positive zero error
(b). If the zero of the circular scale lies above the line of graduation then it is called negative zero error
For positive zero error correction, the zero error should always be subtracted from the observed reading
For negative zero error correction, the zero error must be added to the observed reading.
Solution 10
Two scales in a screw gauge are
(a). A linear scale called the main scale graduated in half millimeters
(b). A circular scale divided into 50 or 100 equal parts.
(a). A linear scale called the main scale graduated in half millimeters
(b). A circular scale divided into 50 or 100 equal parts.
Solution 11
Due to constant use, there is space for the play of screw gauge but gradually this space increases with the use or wear and tear, so that when the screw is moved by rotating it in some direction, it slips in the nut and does not cover any linear distance for some rotation of the screw head. The error due to this is known as backlash error.
It is avoided by turning the screw always in the same direction.
It is avoided by turning the screw always in the same direction.
Solution 12
Following procedure is used to measure the diameter of a wire
(a). Calculate the least count and zero error of the screw gauge.
(b). Place the wire in between the studs. Turn the ratchet clockwise so as to hold the wire gently in between the studs. Record the main scale reading.
(c). Now record the division of circular scale that coincides with the base line of main scale. This circular scale division multiplied by least count will give circular scale reading.
(d). The observed diameter is obtained by adding the circular scale reading to the main scale reading. Subtract the zero error if any, with its proper sign, from the observed diameter to get the true diameter.
Solution 13
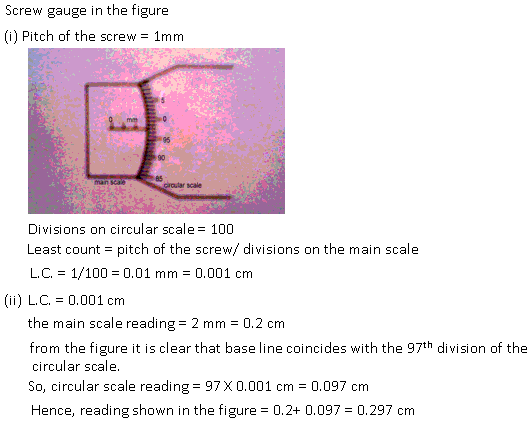
Solution 14
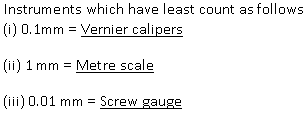
Screw gauge measures a small length to a high accuracy because it has the lowest least count among the given three instruments. And low least count means high accuracy
Solution 15
Solution 16

Solution 17
Solution 18
If the zero of the circular scale remains below the line of graduation then it is called positive zero error. When there is positive zero error, then the instrument reads more than the actual reading. Therefore in order to get the correct reading, the zero error should always be subtracted from the observed reading.
Solution 19
Pitch of the screw gauge = 0.5mm = 0.05 cm
Circular scale divisions = 100
Least Count of screw gauge = pitch of the gauge/circular scale divisions
= 0.05/100
= 0.0005cm
Circular scale divisions = 100
Least Count of screw gauge = pitch of the gauge/circular scale divisions
= 0.05/100
= 0.0005cm
Solution 20
If the zero of the circular scale lies above the line of graduation then it is called negative zero error. When there is negative zero error, then the instrument reads less than the actual reading. Therefore in order to get the correct reading, the zero error should always be added to the observed reading.
Solution 21
(a). False, because the accuracy is higher in case of screw gauge due to lower least count value of 0.01mm
(b). True
(c). False, because its least count is limited to 0.1 cm. thus this length can be measured with an instrument of least count of 0.001 cm i.e. screw gauge
(d). False, the ratchet is used to hold the object under measurement gently between the studs.
(e). True
Solution 22
The space occupied by a body is known as its volume. SI unit of volume is cubic metre (m3)
Solution 23
Yes, 1 cm3 is same as 1 ml.
Solution 24
1 m3 = 1000 litre
1 litre = 1/1000 m3
= 0.001 m3
1 litre = 1/1000 m3
= 0.001 m3
Measurement Exercise 30
Solution 25

Solution 26
SI unit of volume is cubic metre or metre3 (m3).
The relation between liter and metre3
1 metre3 = 1000 liter
The relation between liter and metre3
1 metre3 = 1000 liter
Solution 27
Pitch of the screw = 0.5 mm
Least count = 0.001 mm
Number of divisions = pitch/least count
= 0.5/0.001
= 500
Least count = 0.001 mm
Number of divisions = pitch/least count
= 0.5/0.001
= 500
Solution 28
Solution 29
Precautions to be taken while measuring volume of a solid lighter than water using displacement method
(a). The sinker should be insoluble in water
(b). The sinker should have a high density than water.
(c). Lower meniscus should be read to note down the readings and error due to parallax should be avoided.
(a). The sinker should be insoluble in water
(b). The sinker should have a high density than water.
(c). Lower meniscus should be read to note down the readings and error due to parallax should be avoided.
Solution 30
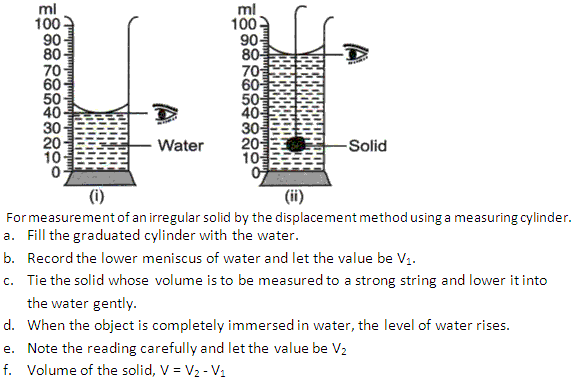
Measurement of volume of an irregular solid soluble in water using a graduated cylinder.
(a). In this case, kerosene or any liquid whose density is lighter than water and in which the solid is not soluble is used.
(b). Fill the graduated cylinder with the liquid.
(c). Record the lower meniscus of liquid and let the value be V1.
(d). Tie the solid whose volume is to be measured to a strong string and lower it into the water gently.
(e). Note the reading carefully and let the value be V2
(f). Volume of the solid, V = V2 - V1
Measurement Exercise 38
Solution 1
Solution 2
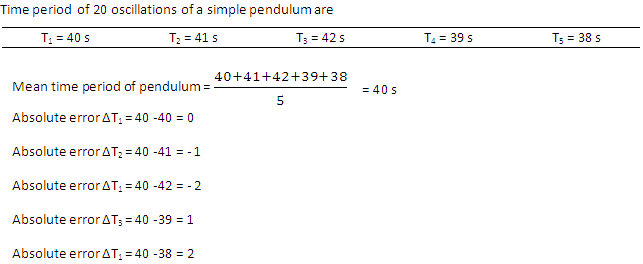
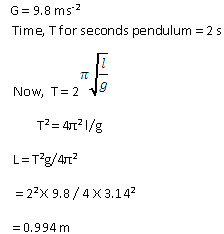
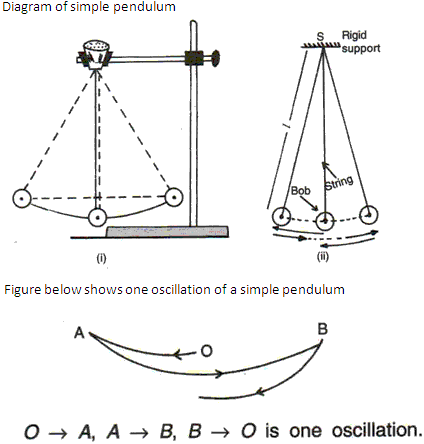
A seconds pendulum is a pendulum which takes 2 seconds to complete one oscillation. The length of seconds pendulum, where g = 9.8ms-2, is nearly 1 m.
Solution 3
A stopwatch is used to measure short intervals of time.
Solution 4
SI unit of frequency is hertz (Hz).
Solution 5
When a pendulum completes one oscillation in one second, then the frequency is one hertz.
Solution 6
The time period, T and frequency of oscillation, f are related as,
T = 1/f or f = 1/T
T = 1/f or f = 1/T
Solution 7
One complete to and fro motion of a pendulum about its mean position is known as oscillation. Amplitude is the magnitude of the maximum displacement of the bob from the mean position on either side when an oscillation takes place.
Solution 8
SI unit of amplitude is metre (m).
Solution 9
A seconds pendulum is a pendulum which takes 2 seconds to complete one oscillation. The length of seconds pendulum, where g = 9.8ms-2, is nearly 1 m.
Solution 10
Solution 11

Solution 12
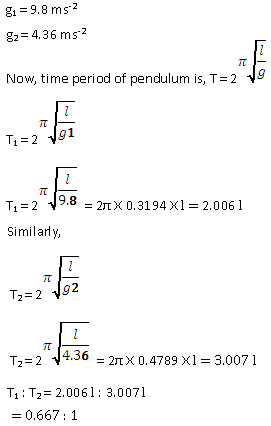
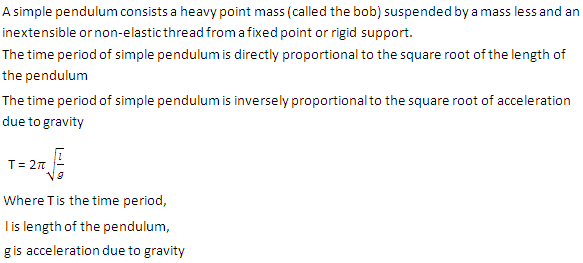
When a pendulum is taken from earth to moon surface, its time period will increase because the acceleration due to gravity on moon is less than that on earth and the time period depends inversely on square root of acceleration due to gravity.
Solution 13
If time period of a pendulum becomes infinite, the pendulum will not oscillate at all as pendulum will take infinite time to complete one oscillation.
Solution 14
Effective length of a simple pendulum is the distance of the point of oscillation (i.e. the centre of the gravity of bob) from the point of suspension.
Solution 15
Solution 16
Solution 17
Solution 18
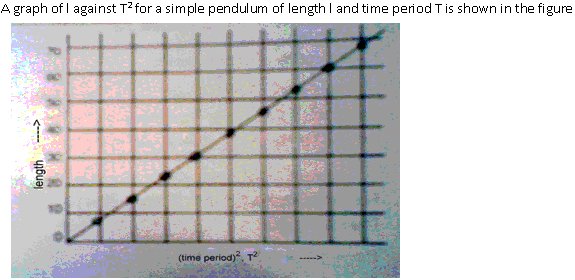
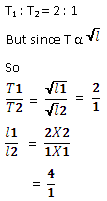
The time period of a pendulum is independent of mass of the bob.
Solution 19
Solution 20
The quantity of matter contained Mass of a body can be measured by using a beam balance. in a body is called its mass. Mass is always constant for a given body.
Solution 21
A beam balance works on the principle of moments. According to the principle of moments, under equilibrium condition, the clockwise moment due to the body on one side of beam equals the anti clockwise moment due to standard weights on the other side of beam.
Solution 22
Precautions to be taken to measure the mass of a body using beam balance are
(a). The beam must be gently lowered before adding or removing weights from the pan.
(b). The weights should not be carried with bare hands to avoid the change in weights due to moisture and dust particles from the surrounding.
(c). The lever should be turned gently, in order to prevent knife edges from chipping.
(d). Never keep the wet or hot objects on the pan.
(e). The weights should be placed into weight box after use.
(f). Whenever you are near the actual weight, you should carefully try the weights in the descending order.
Solution 23
SI units of time and mass are second (s) and kilogram (kg) respectively.
Solution 24
Conditions for a beam balance to be true are
(a). Both the pans must be of equal weights.
(b). Both the arms must be of equal lengths.
(a). Both the pans must be of equal weights.
(b). Both the arms must be of equal lengths.
Measurement Exercise 44
Solution 1
Least count of an instrument refers to the smallest reading that can be accurately measured while using the instrument. For an instrument provided with a scale the least count is the value of one division on its scale.
Solution 2
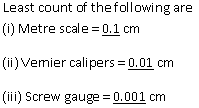
Maximum possible error is 0.1 cm.
Solution 3
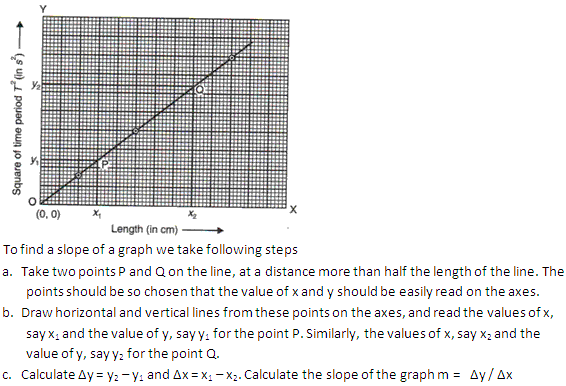
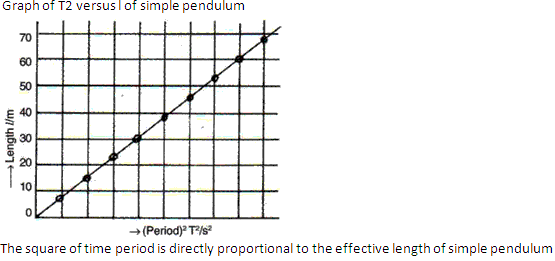
Slope of a graph indentifies the proportional relationship between the quantities plotted.
Solution 4
Solution 5
Solution 6
Accuracy is the extent to which a reported measurement approaches the true value of the quantity measured. This extent is usually described by the least count of the instrument and since the least count for a given instrument is limited hence, the accuracy of the instrument is limited.
Solution 7
Two types of error in a measurement are
(a). Random errors-these errors are due to various factors. In a number of observations we get different readings every time.
These errors can be minimized by taking observations a large number of times and taking the arithmetic mean of the readings.
(b). Gross error- these errors are due to carelessness of the observer like parallax, improper setting of the instrument.
These errors can be minimized only when the observer is careful in setting up of instrument and taking readings.
Solution 8
3000g is the most accurate measurement because it has maximum number of significant figures = 4.
Solution 9
Basically there is no difference between the quantity being measured but there is a difference of significant figures in the measurement.
(a). Number of significant figures = 3
(b). Number of significant figures = 4
(c). Number of significant figures = 5
Since (c) part has maximum number of significant figures = 5, therefore it is most accurate among the given three.
(a). Number of significant figures = 3
(b). Number of significant figures = 4
(c). Number of significant figures = 5
Since (c) part has maximum number of significant figures = 5, therefore it is most accurate among the given three.
Measurement Exercise 46
Solution 1
Unit is a standard quantity of the same kind with which a physical quantity is compared for measuring it.
Solution 2
The units which can neither be derived from one another, nor can they be further resolved into other units are known as fundamental units.
Solution 3
The units which can be expressed in terms of fundamental units of mass, length and time are known as derived units.
Solution 4
A standard metre is equal to 1650763.31 wavelengths in vacuum, of the radiation from krypton isotope of mass 86.
Solution 5
One standard kilogram is equal to the mass of a cylinder of nearly same height and diameter and made up of platinum and iridium alloy.
Solution 6
SI unit of electric current is Ampere (A).
Measurement Exercise 47
Solution 7
Light year is defined as the distance travelled by light in vacuum in one year.
Solution 8
1 Parsec is bigger because 1 Parsec is 3.26 times a light year.
Solution 9
1 Fermi is smaller because 1 Fermi is 10-15 m while 1 micron is 10-6 m.
Solution 10
Parsec refers to the distance at which an arc of length equal to 1 astronomical unit subtends an angle of one second at a point.
No, parsec is not same as astronomical unit (A.U.).
1 Parsec = 2 X 10⁵ A.U.
No, parsec is not same as astronomical unit (A.U.).
1 Parsec = 2 X 10⁵ A.U.
Solution 11
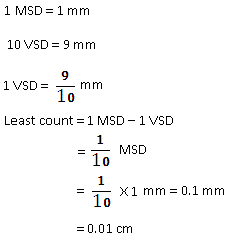
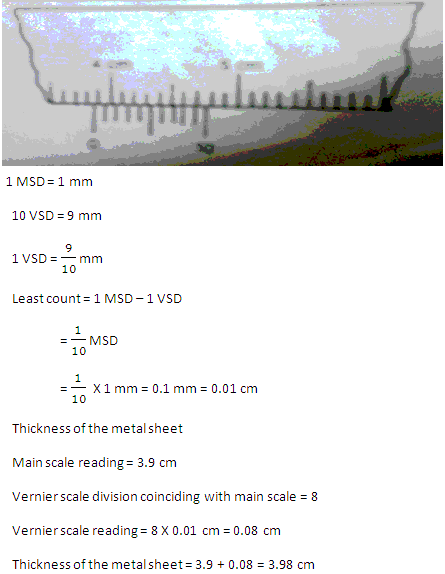
Least count of a vernier caliper used in laboratory is 0.1mm = 0.01cm
Solution 12
Vernier caliper is an instrument used for measuring small lengths of solid objects where an ordinary scale cannot be applied. We can measure the length accurately up to the order of 10-2 cm, 10-3 cm depending upon the vernier used. Therefore a vernier caliper is important to measure the fraction of a smallest division of a measuring scale which otherwise could not be done by the judgment of the eye.
Solution 13
Least count of an instrument refers to the smallest reading that can be accurately measured while using the instrument. For an instrument provided with a scale the least count is the value of one division on its scale.
Solution 14
No, we cannot measure the thickness of a paper with vernier caliper as its least count is only 0.1mm. We should use screw gauge instead as its least count is 0.01 mm as the thickness of the paper is in the range of 10-2 mm.
Solution 15
If the zero of the one scale (vernier scale or circular scale of screw gauge) does not coincide with the zero of the main scale, this is known as zero scale, zero error arises. There are two types of zero error -
(a) If the zero of the scale remains below the line of graduation of the main scale then it is called positive zero error
(b) If the zero of the scale lies above the line of graduation of the main scale then it is called negative zero error
(a) If the zero of the scale remains below the line of graduation of the main scale then it is called positive zero error
(b) If the zero of the scale lies above the line of graduation of the main scale then it is called negative zero error
Solution 16
Screw gauge consists essentially of a screw with a uniform pitch which moves in a nut, thus it is named as screw gauge because the major working part is a screw.
Solution 17

Solution 18
Solution 19
Material used for making screw gauge is stainless steel to avoid expansion and contraction due to change in weather as stainless steel absorbs a little heat.
Solution 20
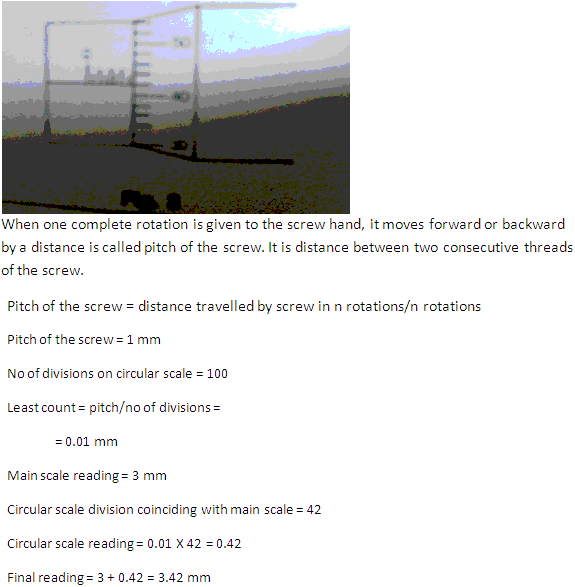
When one complete rotation is given to the screw hand, it moves forward or backward by a distance is called pitch of the screw. It is distance between two consecutive threads of the screw.
Pitch of the screw = distance traveled by screw in n rotations/n rotations
Pitch of the screw = distance traveled by screw in n rotations/n rotations
Solution 21
If the zero of the circular scale lies above the line of graduation then it is called negative zero error. When there is negative zero error, then the instrument reads less than the actual reading. Therefore in order to get the correct reading, the zero error should always be added from the observed reading.
Solution 22
Due to constant use, there is space for the play of screw gauge but gradually this space increases with the use or wear and tear, so that when the screw is moved by rotating it in some direction, it slips in the nut and does not cover any linear distance for some rotation of the screw head. The error due to this is known as backlash error.
It is avoided by turning the screw always in the same direction.
It is avoided by turning the screw always in the same direction.
Solution 23
A screw are threaded to twist in, when turned with a screw driver while nails are smooth to slide in straight when pounded with hammer.
Solution 24
Screw has two types of motions: linear and circular motions.
Solution 25
Unit of Least count of an instrument is cm.
Solution 26
1 micron = 10-6 m.
Solution 27
A physical balance works on the principle of moments. According to the principle of moments, under equilibrium condition, the clockwise moment due to the body on one side of beam equals the anti clockwise moment due to standard weights on the other side of beam.
Solution 28
1 light year = 9.46 X 10¹⁵ m
Solution 29
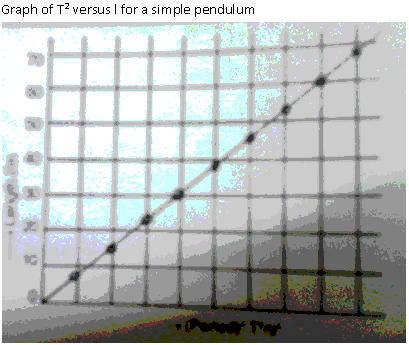
Solution 30
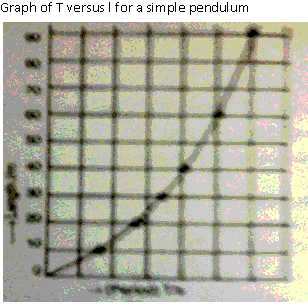
Solution 31
Yes, the vibration is same as the oscillation.
Solution 32
The time period, T and frequency of oscillation, f are related as,
T = 1/ for f = 1/T
T = 1/ for f = 1/T
Solution 33
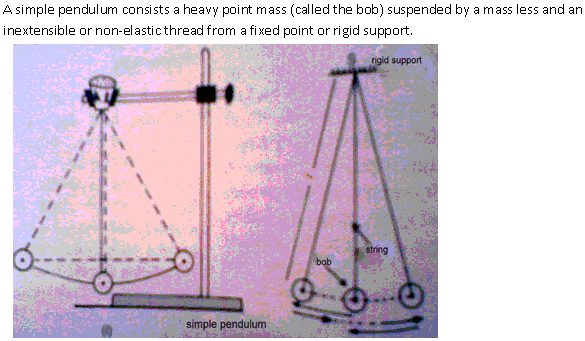
An ideal pendulum is a simple pendulum consists a heavy mass (called the bob) considered as a point mass suspended by a thread which is considered to be mass less and inextensible or non-elastic, from a fixed point or rigid support and in which there is no friction between the support and the string.
Solution 34
Wall clock with a pendulum will run at a faster rate in winter as it pendulum rod get shorter and the pendulum will swing at a faster rate thus the clock would run faster in winters.
Solution 35
Measurement is needed for precise description of any phenomenon happening in the world. For example, if a body is freely falling down to the ground, to understand this phenomenon we must know its velocity, time it will take to reach the ground , etc and to get answer to all our questions we need measurement.
Solution 36

Solution 37
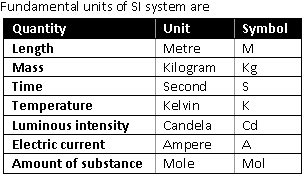
Solution 38
The maintenance of standard units is essential because any variation in these standards would lead to wrong measurements, misleading results and confusing generalizations. The standards are preserved in such a way that they do not undergo any change with the change in temperature, pressure, humidity and other environmental changes.
Solution 39
Main characteristics of a standard unit are as follows
(a). It must be well defined.
(b). It must be of proper size. Very small or large size may cause inconvenience.
(c). It should be easily accessible
(d). It must be reproducible at all places without any difficulty.
(e). It must be accurately defined and must not change with time, place and physical conditions such as pressure, humidity, etc.
(f). It must be widely acceptable all over the world.
Solution 40
The units which can neither be derived from one another, nor can they be further resolved into other units are known as fundamental units. Some of the fundamental units are metre (length), kilogram (mass), second (time), Kelvin (temperature), ampere (current), etc.
Solution 41
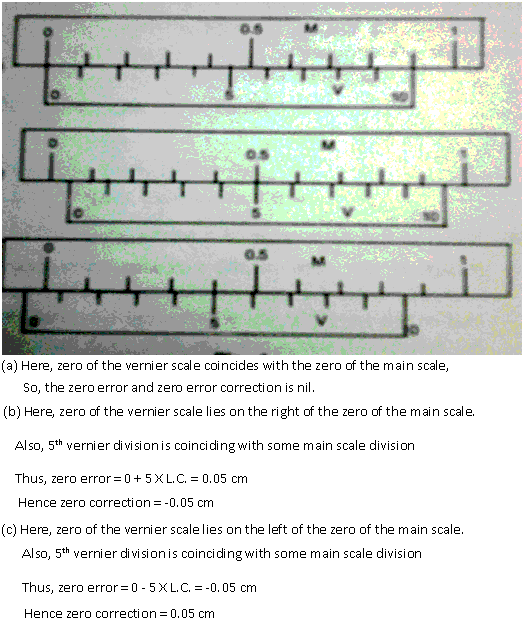
Solution 42
Solution 43
Measurement Exercise 48
Solution 44
If the zero of the circular scale does not coincide with the zero of the main scale (pitch scale) when the end of the movable screw is brought in contact with the fixed end then the screw gauge is said to have a zero error.
Solution 45
In this case, the zero error is positive
Least count of screw gauge = 0.01 mm
Thus, zero error = 0 + 4 X L.C. = 0.04 mm
Least count of screw gauge = 0.01 mm
Thus, zero error = 0 + 4 X L.C. = 0.04 mm
Solution 46
In this case, the zero error is negative
Least count of screw gauge = 0.01 mm
Thus, zero error = (50-47) X L.C.
= 3 X 0.01
= 0.03 mm
Least count of screw gauge = 0.01 mm
Thus, zero error = (50-47) X L.C.
= 3 X 0.01
= 0.03 mm
Solution 47
No, we cannot measure the diameter of a wire by wrapping it around a pencil because it is not very accurate. We can use screw gauge for this purpose as it can measure the diameter correct up to 1/100 of millimeter or even less.
Solution 48
Solution 49
Solution 50
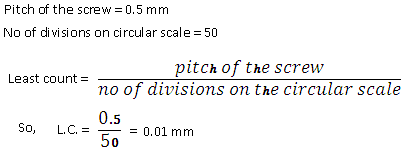
Number of threads =20
Distance covered in 20 threads = 10 mm
Pitch of the screw gauge = 10/20 =0.5 mm
No of divisions on circular scale = 50
Least count = pitch/no of divisions =
= 0.01 mm
Distance covered in 20 threads = 10 mm
Pitch of the screw gauge = 10/20 =0.5 mm
No of divisions on circular scale = 50
Least count = pitch/no of divisions =
= 0.01 mm
Solution 51
(i) Oscillation - One complete to and fro motion of a pendulum about its mean position is known as oscillation.
(ii) Time period - The time taken by a simple pendulum for an oscillation is known as the time period of a simple pendulum.
(iii) Frequency -the number of oscillation made by the pendulum in one second is called frequency. Its SI unit is Hertz (Hz).
(iv) Amplitude - Amplitude is the magnitude of the maximum deviation of the bob from the mean position on either side when an oscillation takes place.
Solution 52
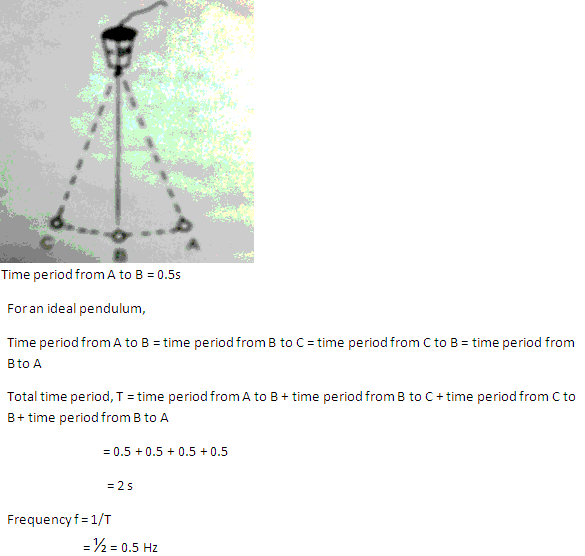
Solution 53
Mass of the metal = 540g
Volume = 200cm3
Density = mass of metal/ volume
= 540 /200 = 2.70 g/cm3
Volume = 200cm3
Density = mass of metal/ volume
= 540 /200 = 2.70 g/cm3
Solution 54
Mass of copper = 540 g
Density of copper = 9 g/cm3
Volume of copper used in the alloy = mass of copper / density
= 540/9 = 60 cm3
Mass of iron = 240 g
Density of iron = 8 g/cm3
Volume of iron used in the alloy = mass of iron / density
= 240/8 = 30 cm3
Total mass of the alloy = 540 + 240 = 780 g
Total volume of the alloy = 60 + 30 = 90
Density of the alloy = mass of the alloy / density of the alloy = 780 / 90 = 8.67 g/cm3
Solution 55
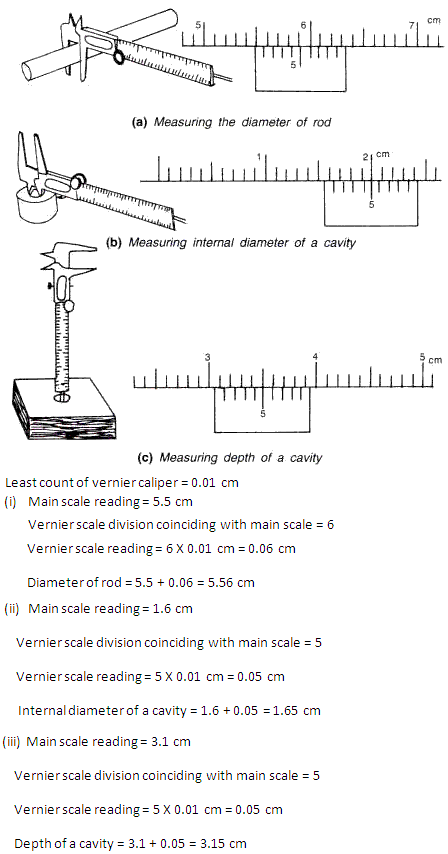
Measurement Exercise 49
Solution 56
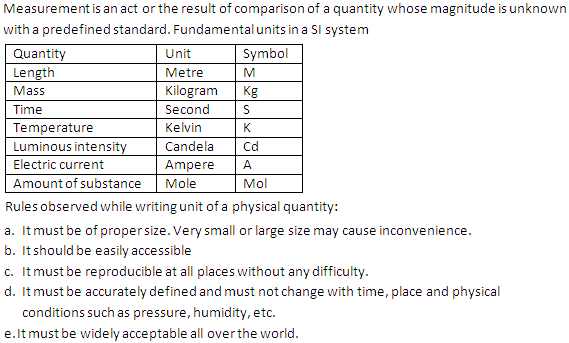
Solution 57
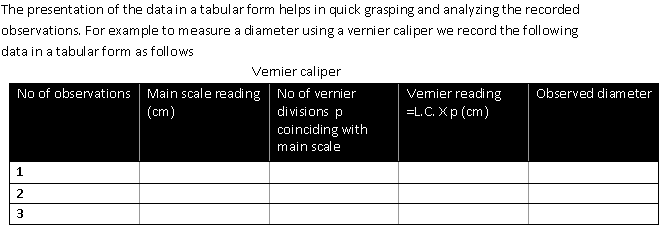
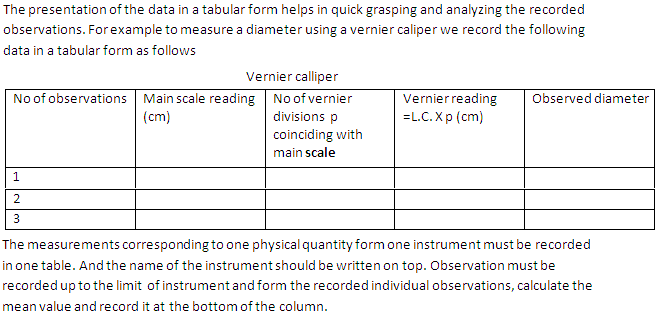
For measuring the length of an object using a vernier calipers, these steps are followed :-
(a). First of all we find the least count and zero error of the vernier calipers.
(b). Place the object whose length is to be measured below the lower jaws and move the jaw till it touches the object. Record the main reading.
(c). Note the division on the vernier scale that coincides with some division of the main scale. Multiply this number of vernier division with least count. This is vernier scale reading.
(d). Record the observed length by adding the main scale reading and the vernier scale reading. Also, subtract zero error with its proper sign, if any, from the observed length to find the true length of the object.
Solution 58
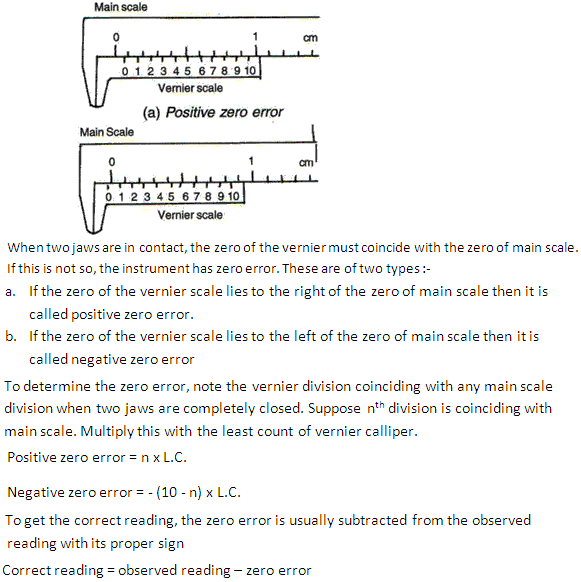
Solution 59
Following procedure is used to measure the diameter of a wire
(a). Calculate the least count and zero error of the screw gauge.
(b). Place the wire in between the studs. Turn the ratchet clockwise so as to hold the wire gently in between the studs. Record the main scale reading.
(c). Now record the division of circular scale that coincides with the base line of main scale. This circular scale division multiplied by least count will give circular scale reading.
(d). The observed diameter is obtained by adding the circular scale reading to the main scale reading. Subtract the zero error if any, with its proper sign, from the observed diameter to get the true diameter.
(a). Calculate the least count and zero error of the screw gauge.
(b). Place the wire in between the studs. Turn the ratchet clockwise so as to hold the wire gently in between the studs. Record the main scale reading.
(c). Now record the division of circular scale that coincides with the base line of main scale. This circular scale division multiplied by least count will give circular scale reading.
(d). The observed diameter is obtained by adding the circular scale reading to the main scale reading. Subtract the zero error if any, with its proper sign, from the observed diameter to get the true diameter.
Solution 60
In order to measure the length of an object using a metre rule, the metre rule must be placed with its marking close to the object, such that the zero marking on the scale coincides with one end of the object. Then the reading on the scale corresponding to the other end of the object will give the length of the object.
Precautions to be taken for measuring the length of the object, the eye must be kept vertically above the end of the object to avoid parallax and the corresponding marking along the line should be carefully read.
The meter scale can measure up to an accuracy of 1mm or 0.1 cm
Precautions to be taken for measuring the length of the object, the eye must be kept vertically above the end of the object to avoid parallax and the corresponding marking along the line should be carefully read.
The meter scale can measure up to an accuracy of 1mm or 0.1 cm
Solution 61
Solution 62
Solution 63
Solution 64
Solution 65

Solution 66
(i) Oscillation - One complete to and fro motion of a pendulum about its mean position is known as oscillation.
(ii) Amplitude - Amplitude is the magnitude of the maximum deviation of the bob from the mean position on either side when an oscillation takes place.
(iii) Frequency - the number of oscillation made by the pendulum in one second is called frequency. Its SI unit is Hertz (Hz).
(iv) Time period - The time taken by a simple pendulum for an oscillation is known as the time period of a simple pendulum.
Solution 67
Measurement Exercise 50
Solution 68
Solution 69
To measure mass of a body using a physical balance
(i). Before starting, bring the plumb line just above the pointed projection by adjusting the leveling screws at the base. The beam is then gently raised using the lever. And it should be ensured that the pointer swings equally on both sides of the zero mark of the scale.
(ii). Now lower the beam gently and given body is kept on left pan.
(iii). Next, place some weight on the right pan form the weight box using the forceps.
(iv). Now the lever is turned towards right so that the beam rises and the power begins to swing to pointer swing on either side. It must be carefully noted that the side to which the pointer moves more, denotes lesser mass on that side.
(v). Go on adjusting the standard weights till the pointer swings equally on both sides of the zero mark.
(vi). At this stage, the total mass of weights on the right pan gives the mass of the body.
Three precautions to be taken to measure the mass of a body using beam balance are
(a). The beam must be gently lowered before adding or removing weights from the pan.
(b). The weights should not be carried with bare hands to avoid the change in weights due to moisture and dust particles from the surrounding
(c). Whenever you are near the actual weight, you should carefully try the weights in the descending order.
Conditions for a beam balance to be true are
(vii). Both the pans must be of equal weights.
(viii). Both the arms must be of equal lengths.
Solution 70
